Before
The After and Before forum is organised by Stacy Fischer, it is a place where amateurs as well as seasoned photographers explain the wow and how about their photo and editing decision.You can read more here about how to take part.
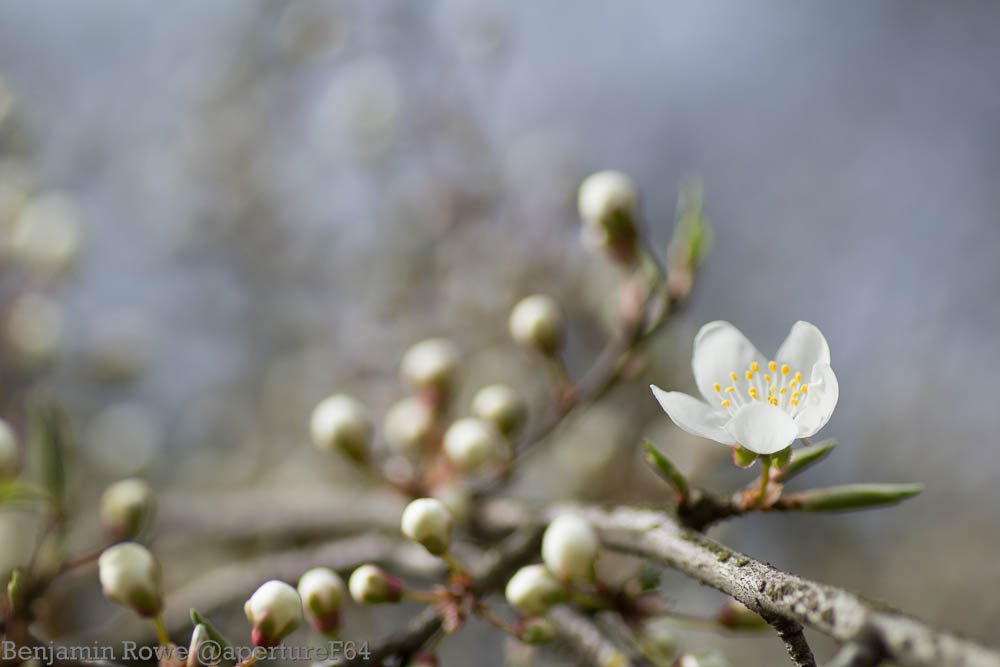
I heard rumours through my social media that blossom was popping all over the city’s parks. I love this part of spring as I can get some really nice shots of blossom and maybe a few insects as well. In true form I headed to the parks looking for the mystery blossom and in truth some had started to bud while overs had a few flowers open.
Last year I was using extension tubes and my nifty 50 to get my close up and Macro blossom shots, this year I have started with my 90mm macro. I do need to get out again adding on my extension tubes as well to get a few more interesting and close up shots.
With this composition I was shooting up slightly getting and got a bit of the sky. I focused on the single flower on this branch and wanted all the buds to fade into a blur. I have noticed with this lens that shooting one stop over gives me a nicer exposure, I am not sure why, however that is what I did and if don’t say so myself the raw image isn’t too bad.

The first thing I did was to apply my proviaesq curves preset as well as lens corrections.

I wanted the top part of the image a bit bluer and darker to bring the viewer’s eye down to the single flower. I reduced the shadows and exposure and added a blue colour to the gradient.

I went on to balance the light tones of the image I reduced the exposure slightly but increased the contrast to make the image pop. I also reduced the clarity to give a soft dreamy feel.

I added an inverted radial adjustment over the flower and increased the clarity to counter the previous step. This has left the flower nice and sharp with the rest of the image dropping off into softness.

I sharpened the image and reduced the noise.

I could have stopped here but I wanted just to add a few more touches. I reduced the saturation slightly and added a vignette as well darken the edges of the image. I also added a minor curves adjustment just to tailor the tone slightly.

I added a second radial adjustment around the flower and reduced the sharpening and increased noise reduction. This has the effect of creating a slight lens softening.

Although the composition was ok, I wasn’t a fan of the space to the right and cropped the image in to reduce this empty space and bring more focus onto the flower. I also adjusted the gradient adjustment from the second step to make the transition smoother.

For one of my first blossom pictures of the year I am really happy with it. It is not the overly bright image with bright popping colours everywhere. It also has the feeling of the cold days we are experiencing which I have emphasised more with the blue added to the gradient. I like the mix of the soft and sharp and the eye is drawn straight to the flower when looking at the picture. The blur of close objects is smooth and the far background a bit rougher which really adds several levels of depth.
Let me know in the comments below what you think of the final image.
Also please head over to Stacy’s blog to see the other participant’s entries into this weeks forum
Remember if you liked this post to; like, share and subscribe.
If you wish to get notifications when I post on my blog, you can follow me on Twitter@apertureF64, on Facebook.com/aperturesixtyfour or alternatively be emailed by subscribing below. All images are the Copyright of Benjamin Rowe , ALL RIGHTS Reserved unless credited to another photographer. For more information please read my Copyright Statement

Thanks for sharing the processes, have learned a lot!
My pleasure Yan, glad you learnt something from the post.
Beautiful and delicate spring image. Nice use of radial tool and graduated filter to produce some subtle, but very effective results, great work as usual Ben!
Thanks Katie, I was going for a subtle manipulation of the soft focus I already had . Thanks for taking the time to comment.
Excellent work. And thanks for taking us step by step through the process. There is a lot of good information here.
Thanks Robin, Glad you like the post.
great result and great explanation. thanks a lot.
My Pleasure Klara, I am glad that you like the final image and the process.
Fabulous work, Ben! The result is incredible. 🙂
Thank you Amy glad you like the editing.
Thanks for sharing this. I have learnt a bit more about Lightroom. I do love the final image
Thanks Raewyn Glad that you have learnt something from this post. Lightroom is a really great editing platform.
thanks Ben, I love your final image, and today I learned about inverted radial filter in Lightroom, thanks, I know that it will be helpful.
The radial adjustment tool with all the of selective adjustment tools are really useful to take an image to the next level. I hope you will have fun with it in the future.
Your photos and tutorials just keep getting better. I look forward to seeing and reading them each week. I’ve only used the radial adjustment for adding highlights to my photos but I will have to experiment more with it!
I find Emillio that I the radial adjustment tool is really flexible as you can isolate areas. I am tending to use it at least once per image.
I am happy that you look forward to my posts and I hope the future ones will meet your expectations.
What a lovely subject. 🙂 Your edits, while subtle, make the image have more depth. I like the addition of a bit more blue and the extra softening of the buds and background.
Ben, very skillful use of LR’s selective editing tools. I love how you layered the radial filters (I tend to do that too) and, of course, added color to the graduated filter. Everything you chose to do resulted in a multi-layered, soft mid and background with the wonderful pop of the in-focus bud. Lovely edit. I’ve just downloaded LR6 and I’m looking forward to learning about the ability to brush out parts of a radial or graduated filter, as well as creating HDR images and panos all within LR! Have you checked it out yet?
I saw the press release but when I checked my creative cloud update manager I think I was a little early. Will have to check again in the morning. 6 is going to have a all the things ADOBE Camera Raw has plus less reasons to switch back to photoshop. It will be interesting to check it out. And update my digital darkroom posts.
I tend to use selective adjustments like I would layers in Photoshop to build and build. I think I have hit the mark if you like the softness as that is what I was going for.
Beautiful edit and a very clear explanation, as usual.